
Cracked, Exploded Macarons? Here’s Why It Happened & How to Fix your Macarons
Your batch of macarons came out of the oven cracked and misshapen—like little volcanos that have erupted—and you’re wondering what went wrong? You followed the recipe. You measured carefully. And yet you have a tray of cracked macs, possibly with one or two normal-looking ones sprinkled in. This is incredibly frustrating, especially when you’ve invested time and ingredients.
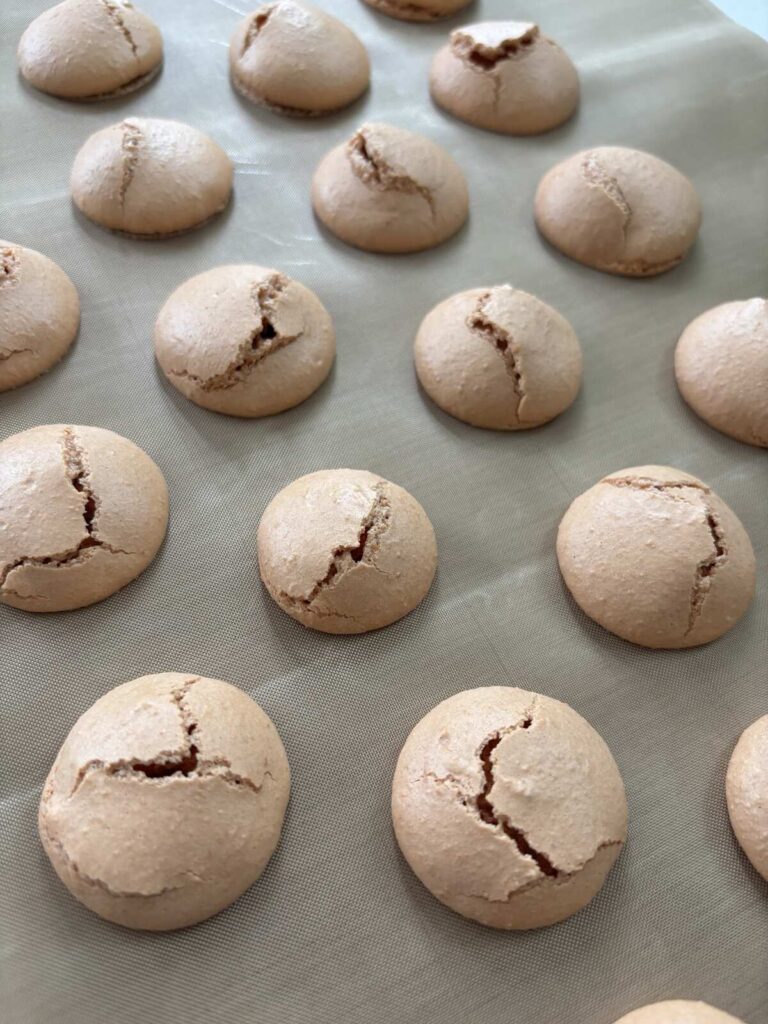
Here’s the truth: I have struggled with cracked macarons too, and with some methodical troubleshooting, I fixed it. And so can you.
Cracked, misshapen macarons is one of the most common issues macaron bakers face. Most macaron bakers will have experienced this frustrating problem once or twice—you are absolutely not alone. The good news? It’s fixable. It’s rarely a single culprit; for me, it was a combination of adjustments. But once you understand the possible causes, the path forward becomes clear.
In this guide, I’m walking you through the troubleshooting steps I took to find the causes of my cracked macarons. I’ve identified the five most likely causes and the adjustments you can try to get back to baking full trays of perfect shells. When you read the causes below, one in particular might jump out at you as the most likely suspect—trust your instinct and start there.
Here’s my best advice: macaron troubleshooting isn’t always a straight line or a quick fix. It’s iterative. You’ll test one variable, see what happens, then move to the next. My hope is the information here will speed up your path to success. The golden rule: only try one change at a time. Otherwise, you won’t know what actually worked.
What Causes Cracked Macarons? The Five Root Causes
Cracking happens when macaron shell is unable to withstand the heat and moisture of the baking process. Let me walk you through the five most common causes. As you read, identify which resonates with your situation:
Cause 1: Oven Temperature Too High (or Fluctuating)
I learned this the hard way: your oven is probably not operating at the temperature you think it is. I spent months blaming my technique before I got a thermometer and realized my oven was running 25°C hotter than my dial said. If you’ve been baking macarons for a while, you know this matters—a lot.
My discovery: Using an internal oven thermometer, I found I needed to set my oven at 130°C (with fan) to achieve an internal temp of 155°C. But here’s where it got interesting: the temperature was occasionally jumping all the way up to 170°C during heating cycles, causing macarons to crack and explode. The sudden spike creates steam inside the shell, which has nowhere to go but through the top.
Do you have an oven thermometer? If yes, skip to the next paragraph. If no, this is your first purchase—it’s the single best investment for macaron success. I use this oven thermometer from Amazon (affiliate link, £7–12). Once you have it, place it in your oven and check the temperature before baking. If it reads above 160°C (140 fan) or fluctuates wildly, that’s the first problem to address.
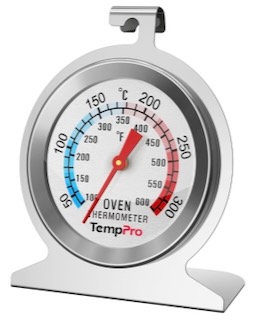
Here’s what I did to fix it: An optimal internal reading is between 150–160°C (130-140°C with fan). To stabilise those temperature swings, I preheated for over an hour (longer than most recipes recommend) and placed two aluminium baking trays nested one inside the other at the bottom of the oven. This acts as a thermal buffer. Some bakers use a pizza stone instead. The goal is to reduce temperature fluctuations. I also discovered that I needed to set my oven at 110°C (with fan) to achieve an internal oven temp of 150–160°C (130-140°C with fan).
Diagnostic check: Does your oven feel inconsistent—heating cycles that are audible or visible? Do your macarons suddenly crack? Is your thermometer reading all over the place? If yes, incorrect oven temperature is likely your culprit.
Cause 2: Meringue Strength (Underwhipped)
There’s a reason every macaron forum says “technique is everything” that’s because it really is. And meringue is the base that everything else depends upon. If your meringue starts out weak, the macaron shell won’t have the structural integrity to withstand oven fluctuations or steam buildup. I noticed that my macarons could withstand temperature swings and humidity much better when I started with a base of properly whipped swiss meringue.
What “stiff peaks” actually looks like:
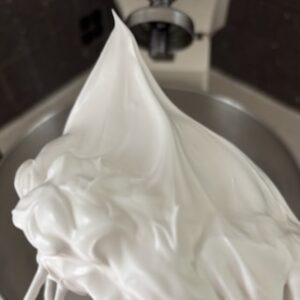
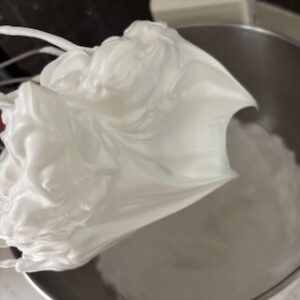
When you stop the mixer you will notice that the meringue is stuck to the whisk in a cloud like clump. If you put the whisk into the meringue in the bowl and lift it out again the peak/s that form should stand up straight. If there’s any drooping or curl at the tips, whisk for another 30 seconds and test again. The texture of the meringue should look thick and glossy, not grainy or broken – grainy indicates over-whipped meringue.
My addition: I also use cream of tartar (1/4 teaspoon per 95-100g egg whites) to strengthen the meringue further. This stabilises the foam and gives you extra insurance against cracking. It’s a small tweak with a big payoff. Another tip is to whisk your meringue more gently – I whisk at a medium low speed (4 on kitchen aid) for 5 minutes then at a medium high speed (6 on kitchen aid) for a further 7-10 minutes.
Note: Some Macaron experts online advise not to whip your meringue up so stiff. That might be when they are using a different meringue method, such as Italian meringue, the advice here applies to swiss meringue, where the egg whites and sugar are gently heated to around 50°C to dissolve the sugar before the meringue is whipped.
Diagnostic check: Do you whisk your meringue quickly and move on? Are you stopping whipping before a truly stiff meringue is achieved? Does your macaron batter reach flowing ribbon consistency very quickly? If yes, under whipped meringue is likely your culprit.
Cause 3: Humidity and Insufficient Drying Time
This is where patience becomes your best friend. On a humid day in summer, your shells might take 45 minutes or even longer to dry properly. I was impatient at first—I wanted to bake immediately—but the shells just weren’t ready. That’s when the cracking happened. The thing is, you can’t rush this step.
Humidity affects how quickly macaron shells form a protective skin. On a humid day, it can take 30–90 minutes for the shells to dry properly before they’re ready for the oven. If you bake them before a skin forms the top of the macaron is soft and moisture inside the macarons turns to steam and makes its way out through the soft top layer forming cracks.
What you’re looking for: A fully dried macaron shell should be completely matte (not shiny), and when you touch it gently with your finger, it should not stick at all. You can actually feel that it has formed a skin. If it’s still tacky, it’s not ready.
In the image below the macarons on the right are dry and matte and the macarons on the left are wet to touch and still have a shiny appearance:
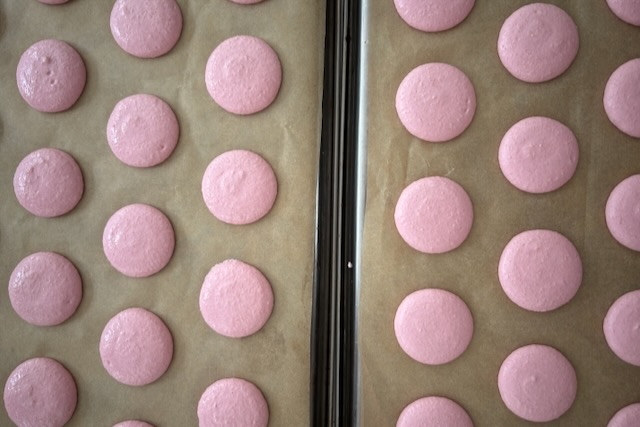
Here’s what works best in my kitchen: I oven-dry my macarons at 90°C for 5 minutes before baking them at the standard temperature (155°C). I have a second oven, which makes this easy. But you have options:
- Option A: Oven-dry in your main oven, then turn the temperature up for baking.
- Option B: Use a dehumidifier or fan to speed up air drying on humid days.
- Option C: Air dry longer (sometimes up to 90 minutes on very humid days) and only proceed when you’re certain they’re bone-dry and don’t stick to your finger at all when you touch them. Not even a tiny bit.
My recommendation: Start with Option C (patient air drying) if you can’t oven-dry. You’ll learn what “fully dry” looks and feels like. Once you know, you can troubleshoot faster.
Diagnostic check: Did you bake on a humid day? Did your shells take longer than 30 minutes to dry? Are you in a kitchen that tends to feel damp? If yes, Cause 3 is likely a factor.
Cause 4: Macaron Batter Ratios (Too Much Moisture)
Macaron batter is a precise balance of egg whites, granulated sugar, almond flour, and icing sugar. Too much of the wet ingredients (egg whites + granulated sugar) and your batter holds excess moisture. This moisture takes longer to evaporate during baking (and drying!), and when it does, it can cause cracking.
My discovery: I was using a ratio that was slightly too wet. Reducing the amount of granulated sugar and egg white by just 5% made a noticeable difference. The batter dried faster and produced more stable shells. It was a small adjustment that paid off.
Diagnostic check: Do your macaron shells take longer to dry than you would expect – over 45 minutes? Are you recording stable oven temperatures but still seeing cracks? If yes, reducing the amount of egg white and granulated sugar in your recipe by 5% is worth a try.
Cause 5: Baking Surface Matters More Than You’d Think
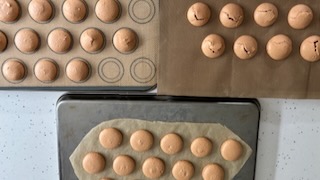
When I was experiencing cracked macarons, I was also experimenting with different baking surfaces. I’d always previously baked on silicone mats but was growing tired of sticky bottoms and cracking issues. So I decided to test them properly.
My experiment: I tried three surfaces side-by-side and tracked the cracking rate:
- Teflon: Most cracking
- Silicone mats: Moderate cracking
- Parchment paper: Least cracking (fewest shells affected)
Why the difference? Parchment paper allows slightly better air circulation around the bottom of the shell. Silicone mats can trap heat and moisture. Teflon can cause the shells to slide or crack under stress. The difference was significant enough that I switched permanently.
My current practice: I use parchment paper. My shells bake more evenly, and I have far fewer cracking issues. Yes, I have to spend time cutting parchment paper (and I have to remove the silicone template from under the macarons before baking), but the trade-off is worth it. Once I made this change, my batch success rate jumped noticeably.
Diagnostic check: Have you recently switched baking surfaces? Are you using the same surface that other bakers recommend, but getting different results? If yes, it might be time to try something new.
The Diagnosis Question
Now, look at your last batch and ask yourself: Which of these causes resonates? Don’t overthink it—your instinct will probably point to one or two. Trust it.
- Does your oven have a history of temperature swings? → Start with Cause 1
- Do you stop whisking your meringue before true stiff peak stage? → Start with Cause 2
- Are you baking in summer or a humid environment? → Start with Cause 3
- Are you using a recipe that feels overly wet and takes a long time to dry? → Start with Cause 4
- Have you recently switched baking surfaces? → Start with Cause 5
Testing Your Fix: Small Batch First
Don’t go straight to a full batch. I wasted so many ingredients learning this the hard way. Instead, test with 5–10 shells from a batch first. Change one variable, bake them, and see what happens. Once you see the difference—no cracks, or fewer cracks—you’ve found your culprit.
How to test:
- Make your normal batch of batter
- Apply ONE of the fixes from the diagnosis (e.g., preheat oven longer, whip meringue until stiffer, air-dry for 90 minutes)
- Bake your test batch and observe: Are shells still cracking? Fewer cracks? No cracks?. If you are testing oven temperature, drying time or baking surface split the batch in 4 to try different temperature, drying time/method or baking surface with the same batch. You will need quite to invest some time to do this but it saves on time and ingredients in the long run.
- If no cracking, that’s your culprit. If still cracking, try the next suspected cause on your next test batch.
Why small batches work for testing: You’ll learn faster and waste fewer macarons. Plus, you’ll visually confirm which fix is working, which builds confidence for full batches. This methodical approach is the fastest way to success.
Frequently Asked Questions About Cracked Macarons
Q: I tried adjusting my oven temperature, but my macarons are still cracking. What now?
Okay, so if oven temp didn’t fix it, I would guess either your meringue wasn’t whipped stiff enough or your shells weren’t dry before baking. I’d try the meringue fix first on your next batch: whip your meringue until it’s absolutely stiff. Remember to only try one change at a time so that you can be sure on what worked.
Q: Does humidity affect cracking?
Yes, humidity changes how quickly your shells dry and if your macarons do not dry fully you may see cracking. On a cold day in winter, your shells may dry faster (which is good). On a warm, humid day, they’ll dry slower (which requires patience or oven-drying).
Q: Can I still eat cracked macarons?
Absolutely. They might not be perfect, but they still taste exactly the same as flawless ones. The cracking is a texture issue, not a flavour issue. I freeze my cracked batches and use them to test filling recipes. Don’t waste them—they’re delicious.
Q: Once I fix this, will it happen again?
Not if you maintain the fundamentals. The biggest factors are (1) oven temperature stability and (2) proper meringue whipping. That said, macaron baking is iterative—even experienced bakers tweak seasonally. But the foundation—stable oven temp + strong meringue—stays constant.
Recipes That Work When You’ve Fixed Cracked Macarons
Now that you’ve fixed your cracked macarons, you’re ready to try some recipes that showcase perfect shells:
- Lemon macarons with two delicious lemon fillings — Zingy lemon flavour balances the sweetness of macaron shells perfectly
- Vanilla buttercream macaron filling — A great baseline to confirm your fix worked. Vanilla is forgiving and highlights shell quality immediately.
- Pumpkin shaped macarons with a pumpkin template — Now your shells are perfect the macaron world is your oyster – here is an easy shape to try
Other Macaron Troubleshooting Guides
If you’re dealing with other macaron issues, check out these guides:
- Oily Macarons: 4 Proven Solutions — Macarons with soft wrinkled tops and oily, patchy look to them? Here’s how to fix them.
Leave a Comment